Years ago, to be more exact in 1998, when we were still travelling around Australia in big circles we made camp at one of the many National parks in Northern Territory. We were not the only ones who had found this spectacular spot with lovely water holes and nice bushwalking. A couple were camping in the same camp ground and on the bonnet of their car stood a cardboard box. We walked past this camp and box a few times a day and after two days the owner of the cardboard box stroke up a chat.
One of the first things he wanted to know was if we could guess what the box was all about. We had figured out that it would have something to do with the sun but could not guess what else it could be. Well we were right. It turned out to be a homemade solar oven. The fellow explained all about it. We were both flabbergasted and amazed that one could build such an oven out of cardboard, newspaper, foil and a sheet of glass. We were that wrapped with this idea and the fellow pulled out a copy of how to build a solar oven. Grateful for this copy we went back to our camp and studied the instructions. The instructions were featured in “Earth Garden” do not ask me what year but written by Marian McCain.
We decided on the spot to give it a go and next time we had to go to town to do the fortnightly shopping we got all the materials needed. It took us a day to build the solar oven and we were very proud of ourselves when the oven was finished. Getting up early next day ready to test drive the oven we started preparing food for lunch. It all depends what you want to cook as some food takes more cooking time than others. As we all know.
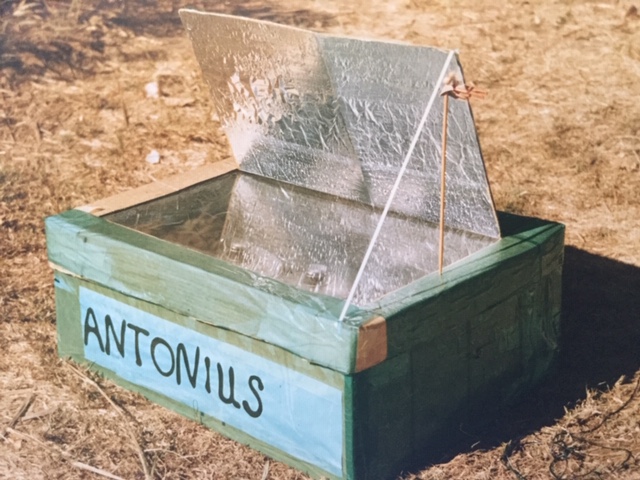
With time and practice we got more experienced and we were especially happy with our solar breads. I started writing down recipes to share with others but for some reason we never again meet anyone with a solar oven. By the way we called our oven for Antonius. Nowadays we have a commercial solar oven which our friend Jutta gave us.
A few notes about the solar bread. You mix together the ingredients the day before cooking. When it is all mixed you put the dough in a black pot (black because this attracts heat) to rest and raise with a cloth to cover.
Next day put a black lid on the black pot with the dough (do not stir the dough. Place in the solar oven early in the morning in a sunny spot. As the sun move above you adjust the oven accordingly.
When the bread is baked which will most likely take all day take it out of the pot and wrap the bread in a damp cloth overnight to finish baking.
It is ready to eat the next day but I think it is best after 2 -3 days.
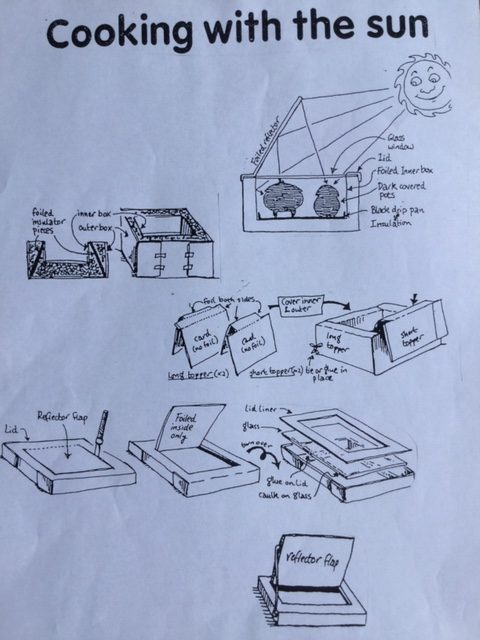
How to build a solar oven
A solar box cooker has:
- large inner box covered with aluminium foil on both sides
- a large outer box foiled on the inside only
- insulation between boxes
- toppers to seal the space between
- tight fitting lid with a glass/plexiglass window to let in sunlight and hold heat inside. As part of the lid a shiny flap, a reflector, is propped up to bounce more sunlight into the box. When not in use it closes to cover and protect the glass/plexiglass
- a prop to hold up reflector
- a black metal tray inside the box at the bottom, to absorb heat from sunlight
- dark/black pots which heat and cook the food
Materials:
Materials used for the inner box and insulation must withstand high temperatures, be non-toxic, and not conduct heat readily (as metal does). It is recommended to use two corrugated cardboard boxes. One at about 50 cm by 60 cm by 20 cm deep, the other 60 cm by 70 cm by 25 cm deep. (or get cardboard to make these boxes). Size is important. Boxes smaller than this will only cook small amounts of food, because they won’t get enough solar energy. They will not accumulate enough heat to cook the food.
You also need:
- a glass pane slightly larger than inner box
- half a l of water-based white glue or carpenter’s glue
- about 23 meters of aluminium foil 30 cm wide
- insulation – crumpled newspaper. Don’t use polystyrene foam or plastic as this will melt
- a prop for the reflector and some string or cord
- silicone caulk or paper maché
The Inner Box:
Glue the aluminium foil to the inside and outside of the inner box (shiny side out). It may help to flatten a ready-made box, if that is what you are using. The box can be reformed using masking tape or glue. A clean paint brush or roller helps spread the glue thinly. Overlap the edges of foil slightly and work out air bubbles. Wrinkles won’t hurt.
The Outer Box:
You need to glue foil only to the inside of the outer box. There needs to be a 6 mm space between all four sides of the two boxes, and a 2.5 mm between bottoms. The outer box can be material other than cardboard such as wood.
Supports and insulation:
Make eight supports about 25mm high to sit in the bottom of the outer box. Pack the rest of the bottom with insulation material. Then, place the inner box on the supports so that there is 60mm space between the two boxes on each side.
One way to insulate the gap between the boxes is to make cardboard insulators covered with foil. The bottom of each insulator piece is set against the outside box, and the top against the inner, the spaces are then filled with crumbled newspaper or use clean wool or straw. A well-insulated cooker should not feel hot on the outside, except for the glass.
When all insulation is in, you must seal the top space between the two boxes with four cardboard toppers, which are foiled on both sides to just outside the fold.
The four toppers fold to cover both the inside of the inner box and the outside of the outer box. Can be glued in.
The lid and reflector:
You can make the lid and reflector from cardboard. Make sure it provides a snug seal. Once the lid is made, cut three sides of an opening to frame the glass/plexiglass. Fold back the flap created and foil its inside surface to make the reflector. Put silicone caulk or paper maché around the edge of the glass on one side, then press the glass inside of the lid so that there is a complete seal around. Spread full-strength glue on the cardboard, outside the edge of the glass, and press the lid into place. Cover with weights until the glue is dry.
The prop:
One end of the prop attaches to the edge of the reflector flap and the other to the edge or lid frame. The prop holds the reflector flap at an angle to reflect more sunlight into the box and must be stable, even on windy days. The simplest prop is a stick with notches at both ends that can be tied by cord to one corner of the reflector and the side of the lid, or use coat hanger wire.
Black liner tray:
The black thin metal tray in the bottom of the inner box catches spills and its main function is to draw heat to the cooking pots. It is important to use dark/black pots with tight-fitting lids.
The final step:
Before cooking food for the first time in your solar oven let it heat up in the sun for several hours while empty to make sure all paint and glue is dry and won’t give off fumes.
Solar Cooking Recipes
Small Pumpkin Bread
2 cups plain flour
1 cup boiled brown rice
1 cup boiled pumpkin
Half cup rolled oats
4 desert spoon rye flour
4 desert spoon sesame seeds
2 dessert spoon pearl barley, soaked in water overnight
2 dessert spoon linseed, soaked in water overnight
2 tea spoon honey
1 tea spoon molasses
1 cup of beer
2 table spoon full oat meal
Small Antonius Bread
1 cup plain flour
2 dessert spoon rye flour
2 dessert spoon oat bran
2 dessert spoon oat meal
3 dessert spoon pearl barley, soaked in water overnight
Half onion chopped fine
1 teaspoon veggie salt
Warm water
Jim Jim Billabong Bread
2 cup and 5 table spoon plain flour
4 dessert spoon rye flour
4 dessert spoon oat bran
4 dessert spoon oat meal
2 dessert spoon sunflower kernels
2 dessert spoon pearl barley, soaked in water overnight
1 dessert spoon linseed, soaked in water overnight
1 cup cooked brown rice
2 teaspoon honey
2 teaspoon veggie salt
2 teaspoon molasses
Thyme
Warm water
Sourdough
These were the early recipes today our solar breads are made a bit different being sourdough breads.
How to start the sourdough:
150ml of buttermilk
250ml rye
1 teaspoon salt
Mix the butter milk and rye together. Sprinkle salt on top. Let stand in a warm place for 2 – 3 days covered with cling wrap
Black Sapote Bread
Use half of the above sourdough start mixture
2 medium very ripe Black Sapote
Rye and wheat kernels soaked overnight
Stone ground flour
Mix well and keep adding flour until you have the right consistency